QVOICE Cloud Phone System
¶ Cloud Phone Features
| Account Management Directory Service Bulk Number Porting Call Forwarding Find Me Rules Call Notification Call Screening Call Transfer Caller ID (Incoming) Caller ID (Outgoing) Soft Phone with Zoiper Custom Local Numbers Custom Toll Free Number |
Dial-by-Name Directory Do Not Disturb E911 Dialing Fax From Phone Follow Me Greetings HD Voice Hold Music In-Call Features Intuitive Web Interface Local & Long Distance Local Numbers Menus (IVR) |
Number Porting Queues Ring-Ready Phones Schedules Text Messaging (SMS) Toll Free Phone Numbers Canadian Based Support User Extensions Voicemail Voicemail to Email Email to Fax User Control Panel Routing / Hunt Groups |
¶ QVOICE Portals
- System Admin Portal: https://qvoice.net/portal
- System administration
- Account creation
- Number importing
- User and Admin Onboarding
- Phone provisioning
- Reports and Analytics
- SmartPBX Portal: https://qvoice.net
- Easy to use, self service tenant PBX administration
- SmartPBX
- Quick PBX configurator
- Callflow:
- Advanced PBX configuration including visual IVR builder
- Advanced PBX configuration including visual IVR builder
- SmartPBX
- Easy to use, self service tenant PBX administration
- NOC Portal for Admins
- Monitoring, Alerting, Reporting
  |
|
 |
¶ Multi-Tenant Accounts
QVOICE is a multi-tenant system that supports multiple nested account hierarchies.
Each account is an independent customer with its own unique realm/domain. An account can be configured as a pbx user or a reseller. A reseller is a special account that can create its own customers/accounts.
- Master Account
- Customer 1
- Customer 2
- Customer 3
- Reseller 1
- Reseller 1’s Customer 1
- Reseller 1’s Customer 2
- Reseller 1’s Reseller A
- Reseller A’s Customer 1
- Reseller A’s Customer 2
- Reseller 2
- Reseller 2’s Customer 1
- Reseller 2’s Customer 2
¶ Master Admin Account
This is the top level account and is the first created account on the fonoUC system. This account has special privileges and is able to create subsequent accounts. The service provider would use this account to create new or manage existing accounts for their customers.
- Full admin/root privileges
- Account Management
- Create new accounts
- Make an account a reseller
- Modify or Delete accounts
- Login as (masquerade) as other accounts
- Add and remove funds from an account
- Phone Number Management
- Add numbers/DIDs into the fonoUC platform via GUI Number Manager
Note: only Master Admin account users can add DIDs into the fonoUC platform.
- Add numbers/DIDs into the fonoUC platform via GUI Number Manager
- Carrier Management
- Define peering/trunking gateways to external sip trunk and DID/phone number providers.
- Define peering/trunking gateways to external sip trunk and DID/phone number providers.
¶ Standard Account
Standard Account is considered an “end-user” account owned by the end customers. Each account has two types of users: Admin and Normal users. The customer would self provision their PBX using the Admin user privileges on the Standard Account. Alternatively the service provider’s onboarding team would use the Master Admin Account: Admin user to log into the customer’s account as an Admin and provision the customer's PBX.
¶ Reseller Account
Reseller account is a special “Standard Account” that has been elevated to a Reseller level by the Master Admin. The Reseller “owns” his/her customers, thus Reseller is able to create Standard “sub” accounts under the Reseller account for each of his/her end customers.

¶ Create a new Cloud PBX Account
In this section we will outline all the steps necessary to create a new customer/tenant account and provision cloud PBX services for a new customer.
Summary
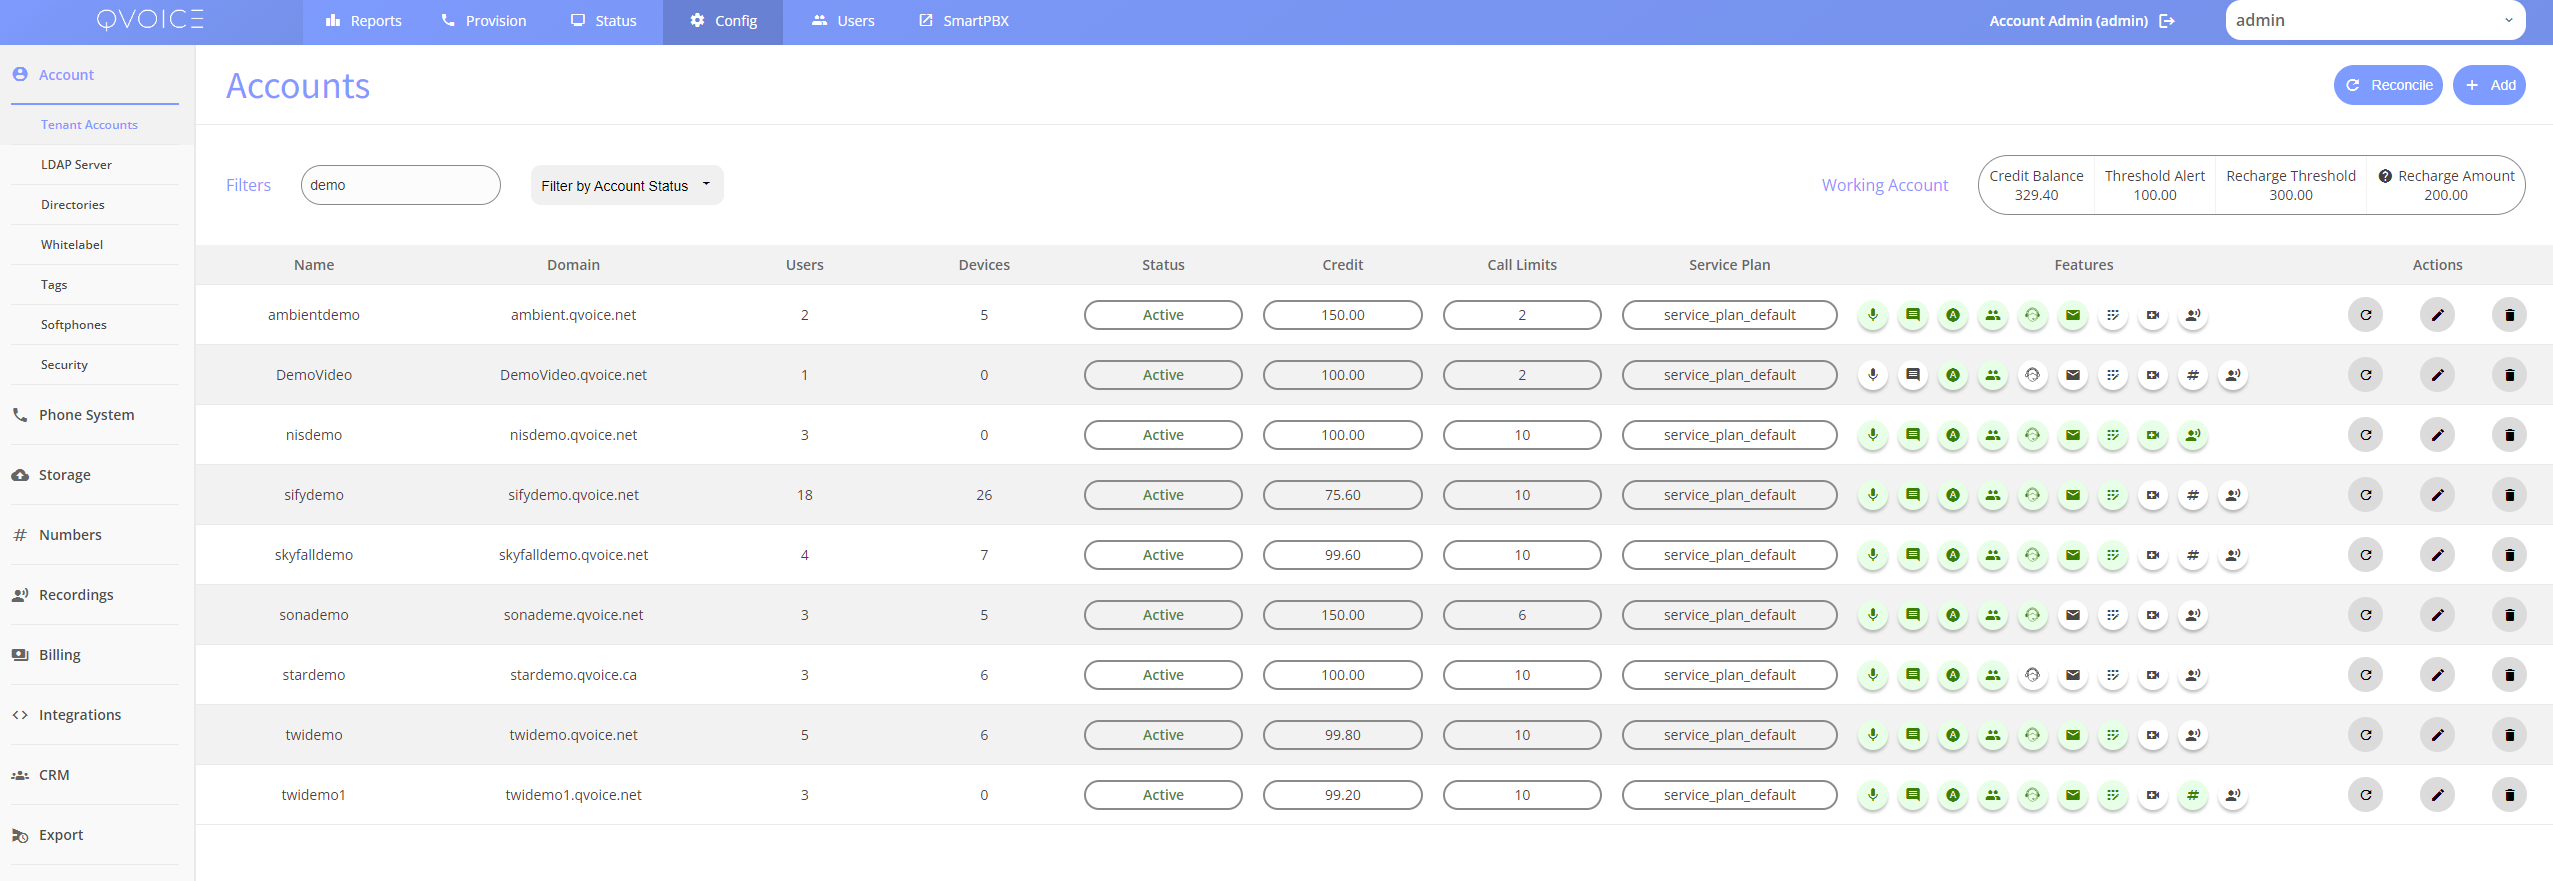
Log into the Admin Portal
- Example: https://qvoice.net/portal/configuration/accounts
- Using Master or Reseller Admin Account
- Note the top account selector
Select Config -> Accounts
- Click on +Add
- Specify account Name and unique Realm
- Note: It is suggested that Realm name be related to the account name for easy of future provisioning and debugging. Realm name is a FQDN/domain/URL that is reachable from the internet.
- Specify the account address and administrator info
- Specify the account features, if unsure leave default, all settings can be changed later
- Configure the Service Plan
- Service Plan is to define account/tenant billing plan along with usage ratedeck. Depending
- Choose to overwrite service plan options, such as custom pricing.
- Configure PBX Limits
- How many two way simultaneous calls
- Disable post-pay, and enable pre-pay as part of fraud prevention on metered calling.
- Configure Fraud limits based on maximum daily rate usage
- Save
¶ Log into the Master Admin Account
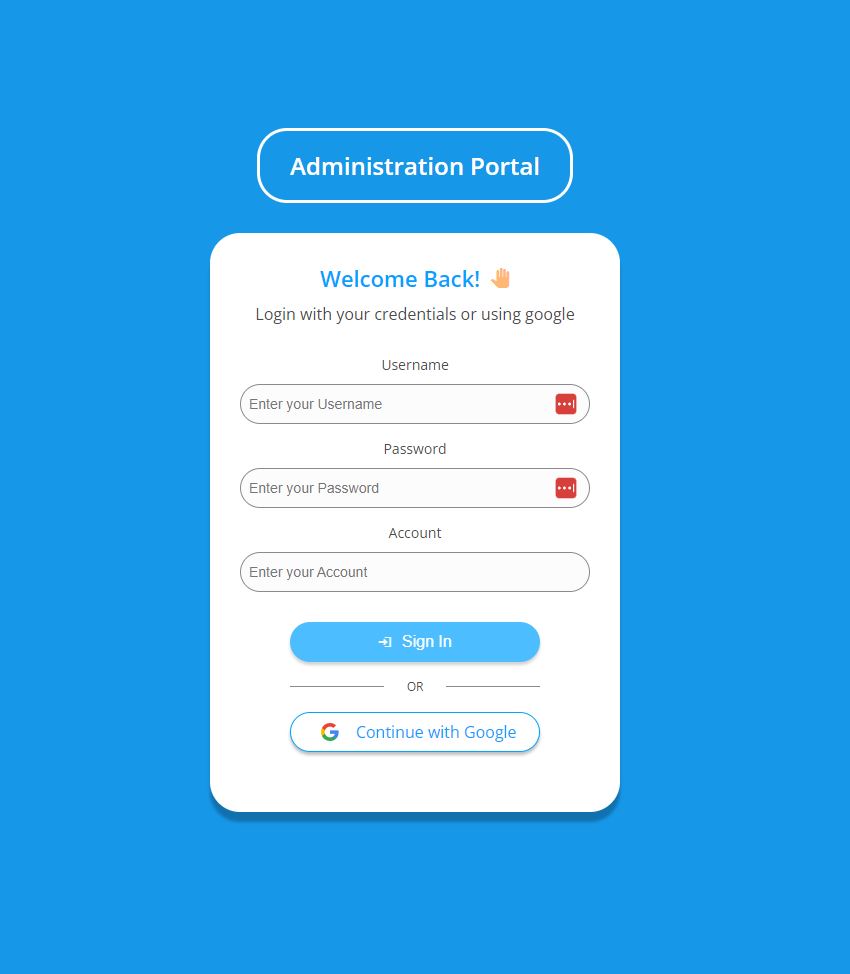
- URL: https://qvoice.net/portal/configuration/accounts
- Credentials
- The Master Account name is “admin”, alternatively use your Reseller account credentials.
- Navigate to Config -> Accounts
Select +Add on Add New Account
Click on Add New Account to create a new account.
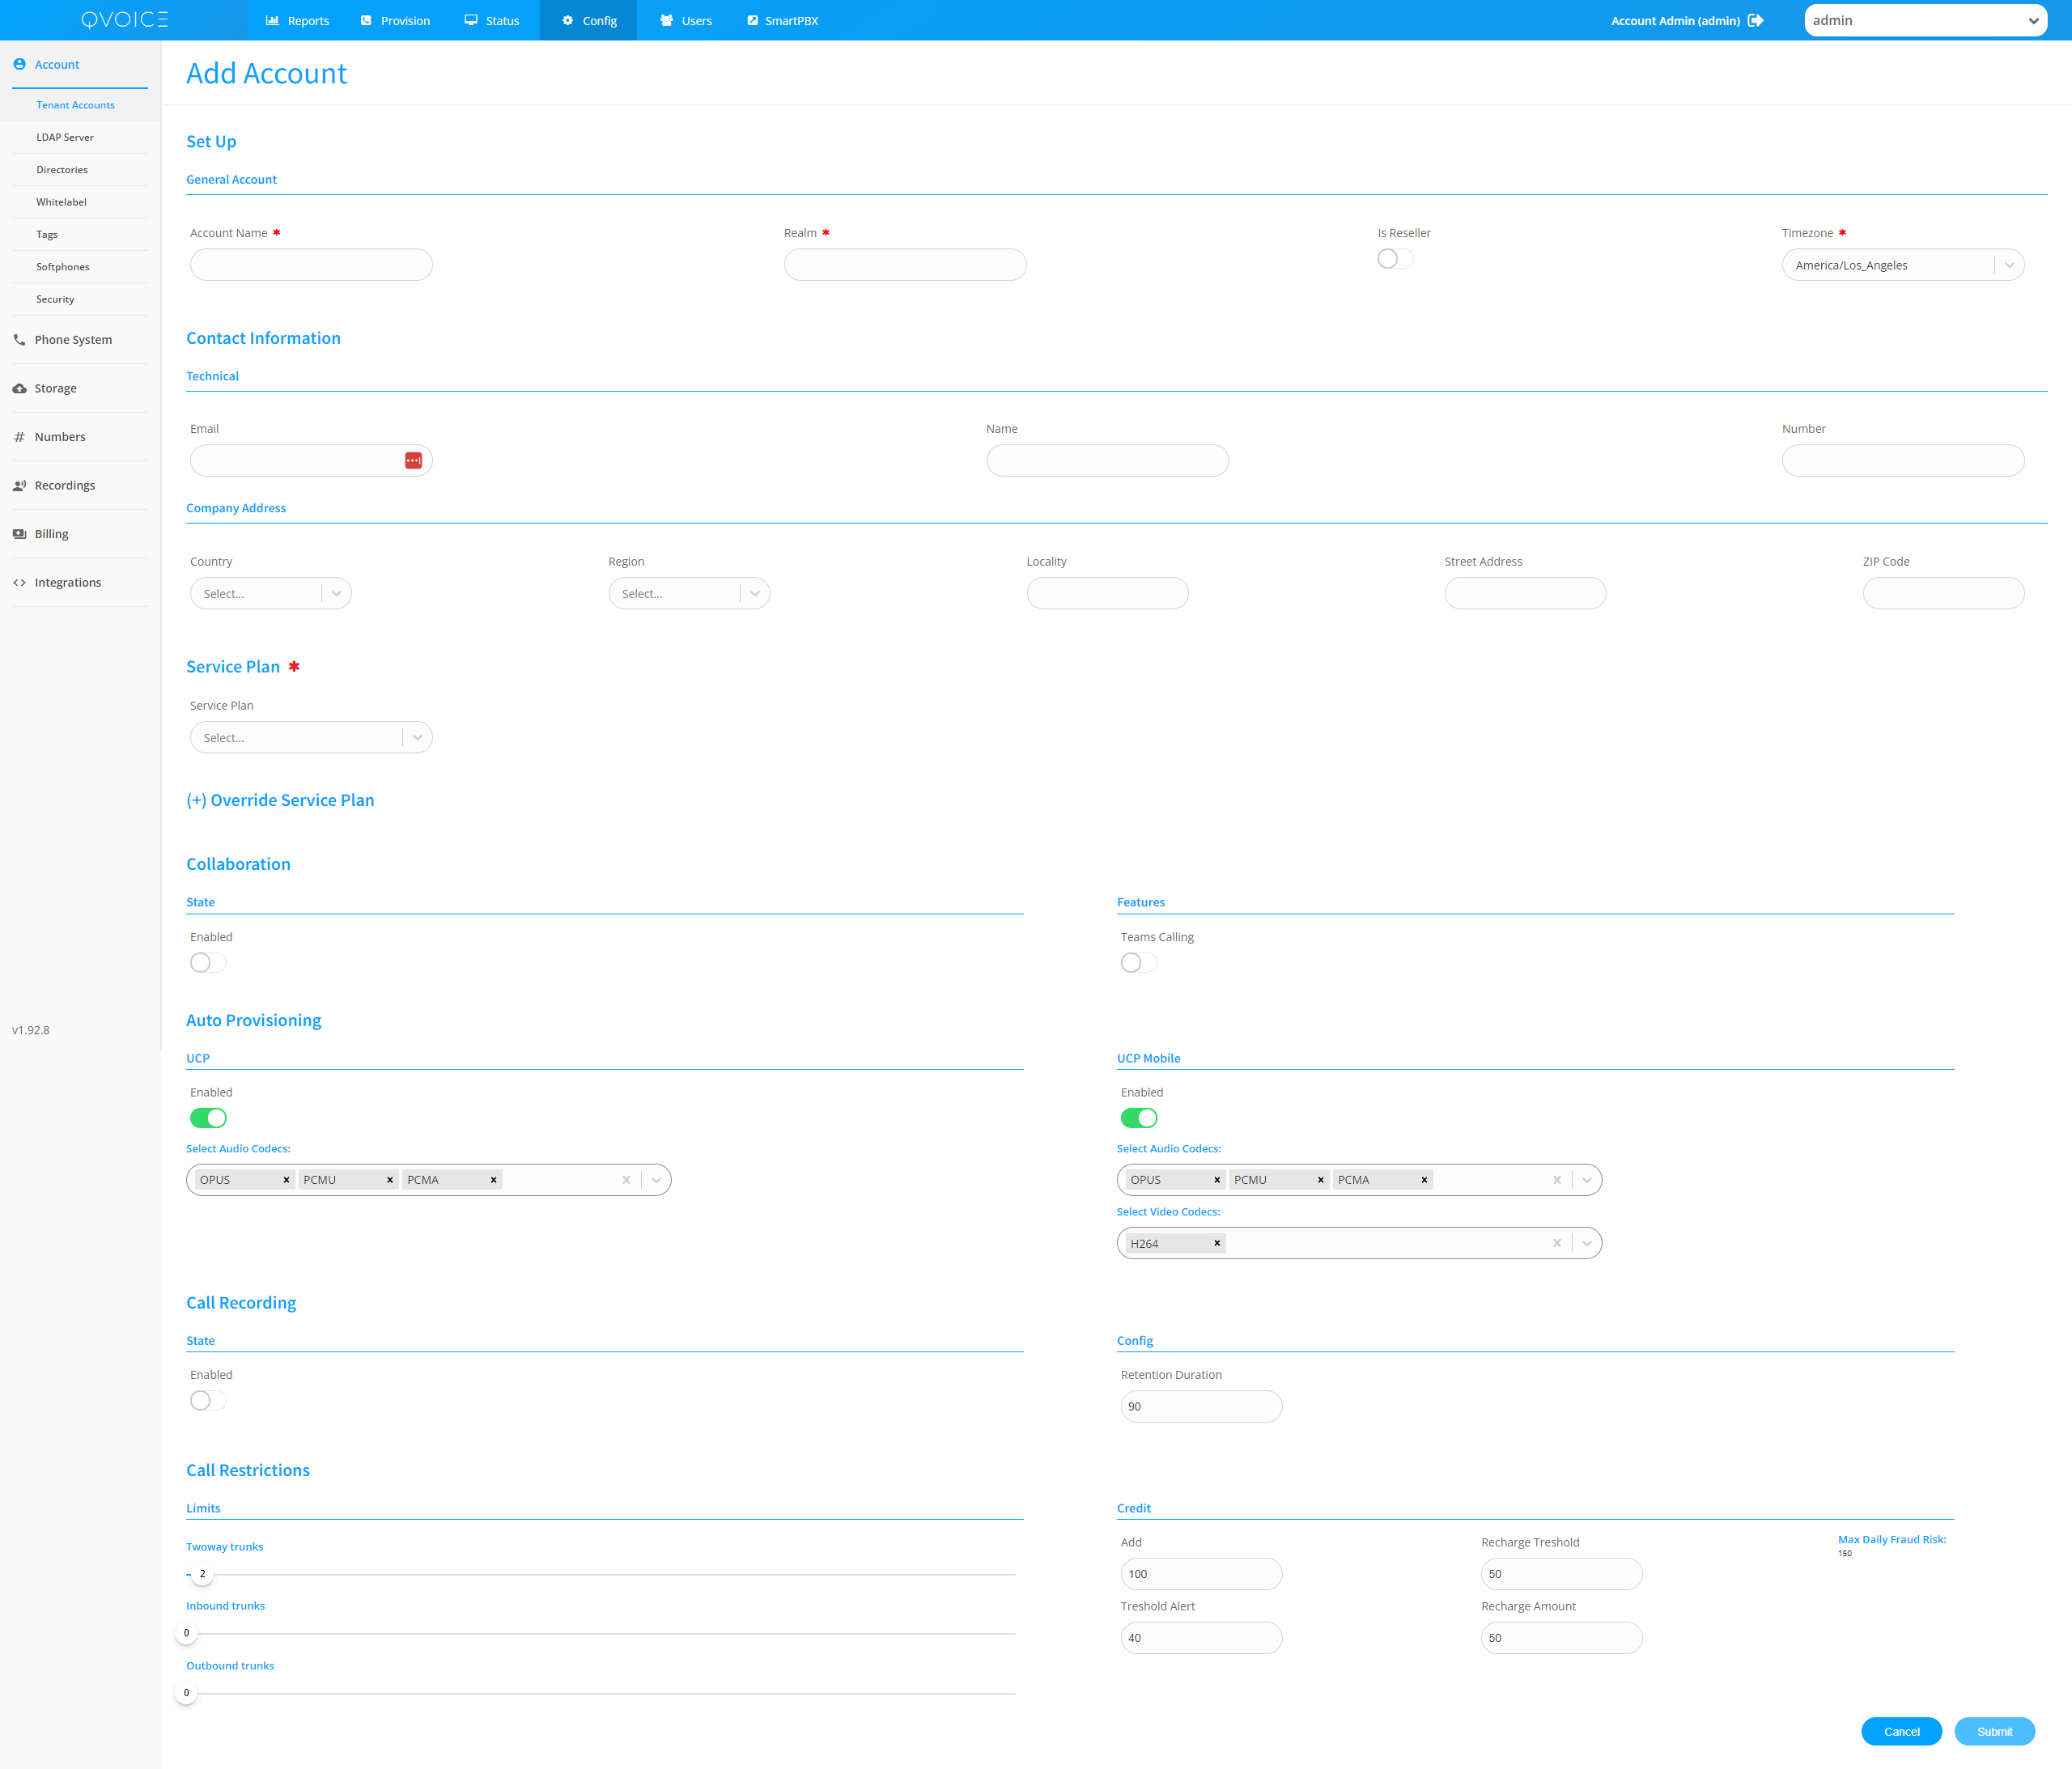
¶ Specify account Name, unique Realm and Administrator credentials
| Account Name | Descriptive account name. |
| Account Realm | Used as part of SIP Registration credentials and provides isolation between different accounts, allowing one to have the same extension number (eg: 1000) on two different accounts. The realm should be defined as: {account name}.domain.com; eg: bestbuy.cloudbpx.com |
| Timezone | Set the timezone of the customer. Each account can have a different time zone. |
| Administrator | For security reasons let the system define the password which will be emailed to the administrator's email. |
¶ Specify the Service Plan
Service Plan is used to define how and what the customer should be billed for. Almost every feature of the platform can be “charged for”: the end customer will be prompted to accept new charges when adding new features or creating resources such as users and devices.
Service plan can be overridden via the + sign. Admin can choose to provide special per user, DID or porting pricing or offer a discount from the MSRP. Furthermore, Admin can setup multiple Service Plans that are tied to custom Rate Decks that are used for per-minute call rating and billing.
¶ Specify Limits
Specify the number of consecutive two way calls this account can make and disable post pay and enable pre-pay for metered calls.
The pre-pay feature is used as a part for fraud prevention. Each account can spend a maximum amount of money per-month on per-minute (long distance) calls, thus in the event of fraud, the customer is protected by a “soft cap”. The account will self top-up once during a month in order to minimize service disruption due to normal calling.
¶ Add Phone Numbers to the New Account
Log into the Portal
- https://qvoice.net/portal/configuration/numbers
- Navigate to Config -> Numbers
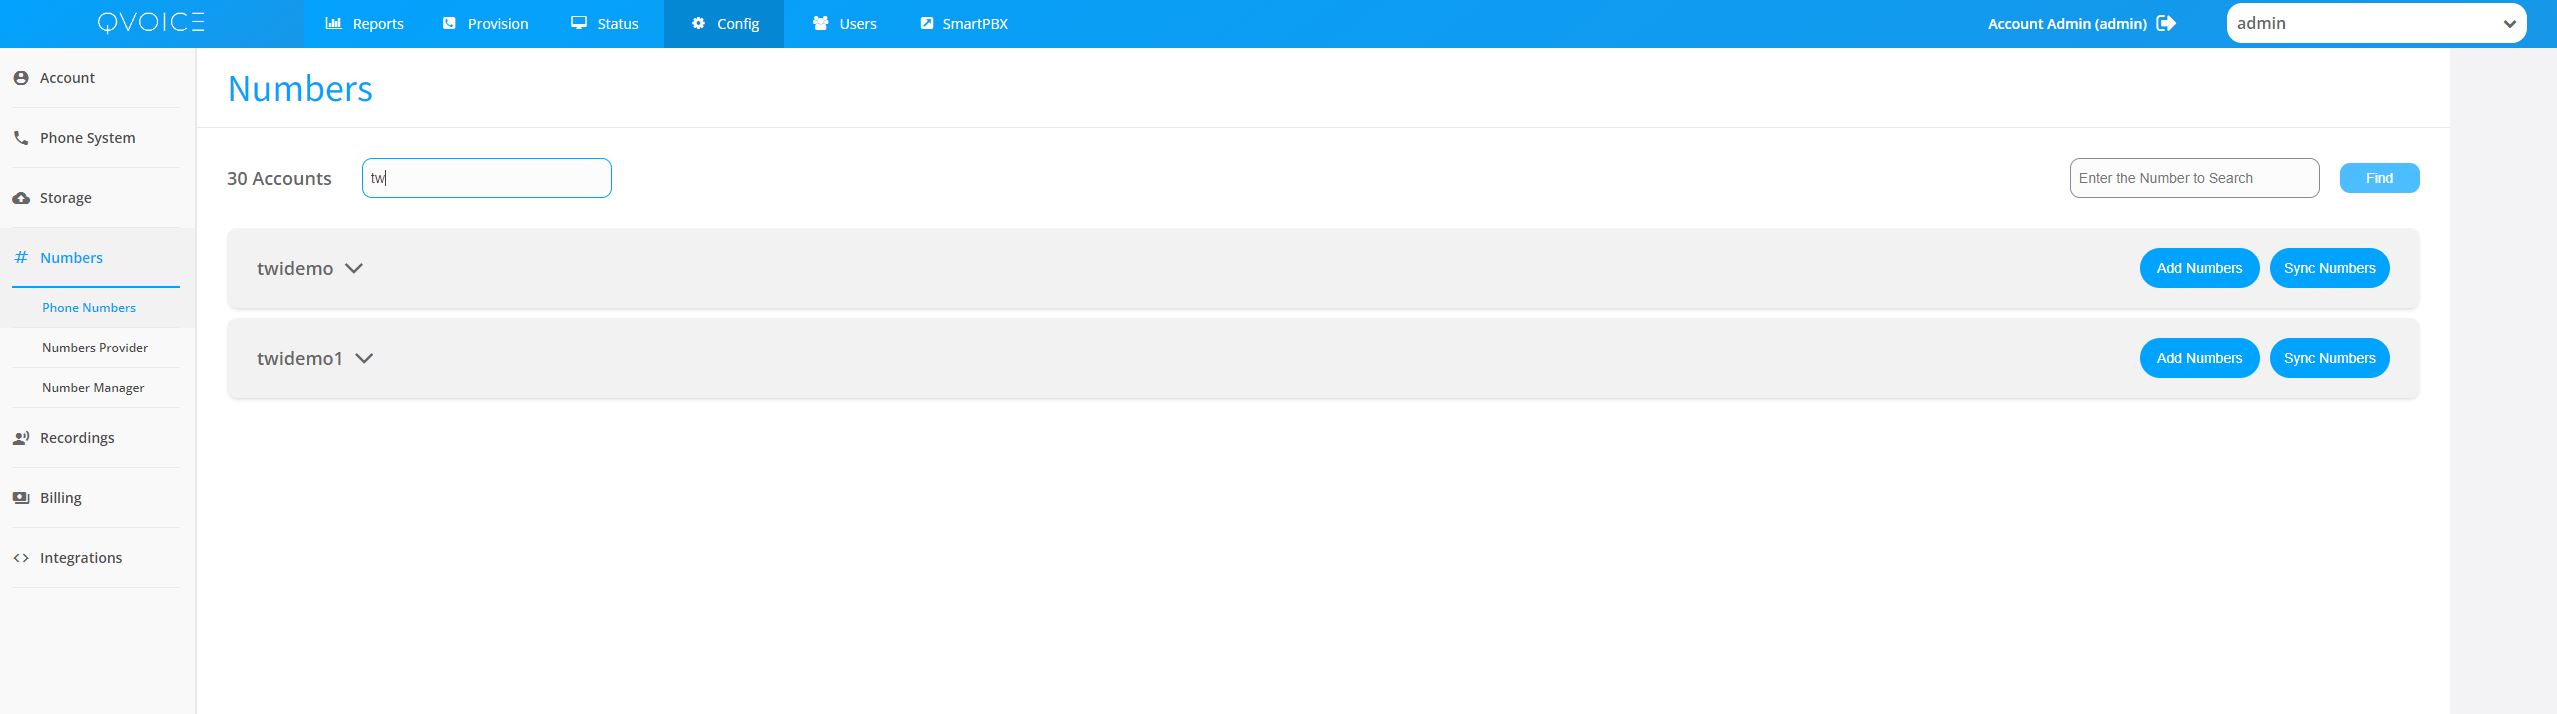
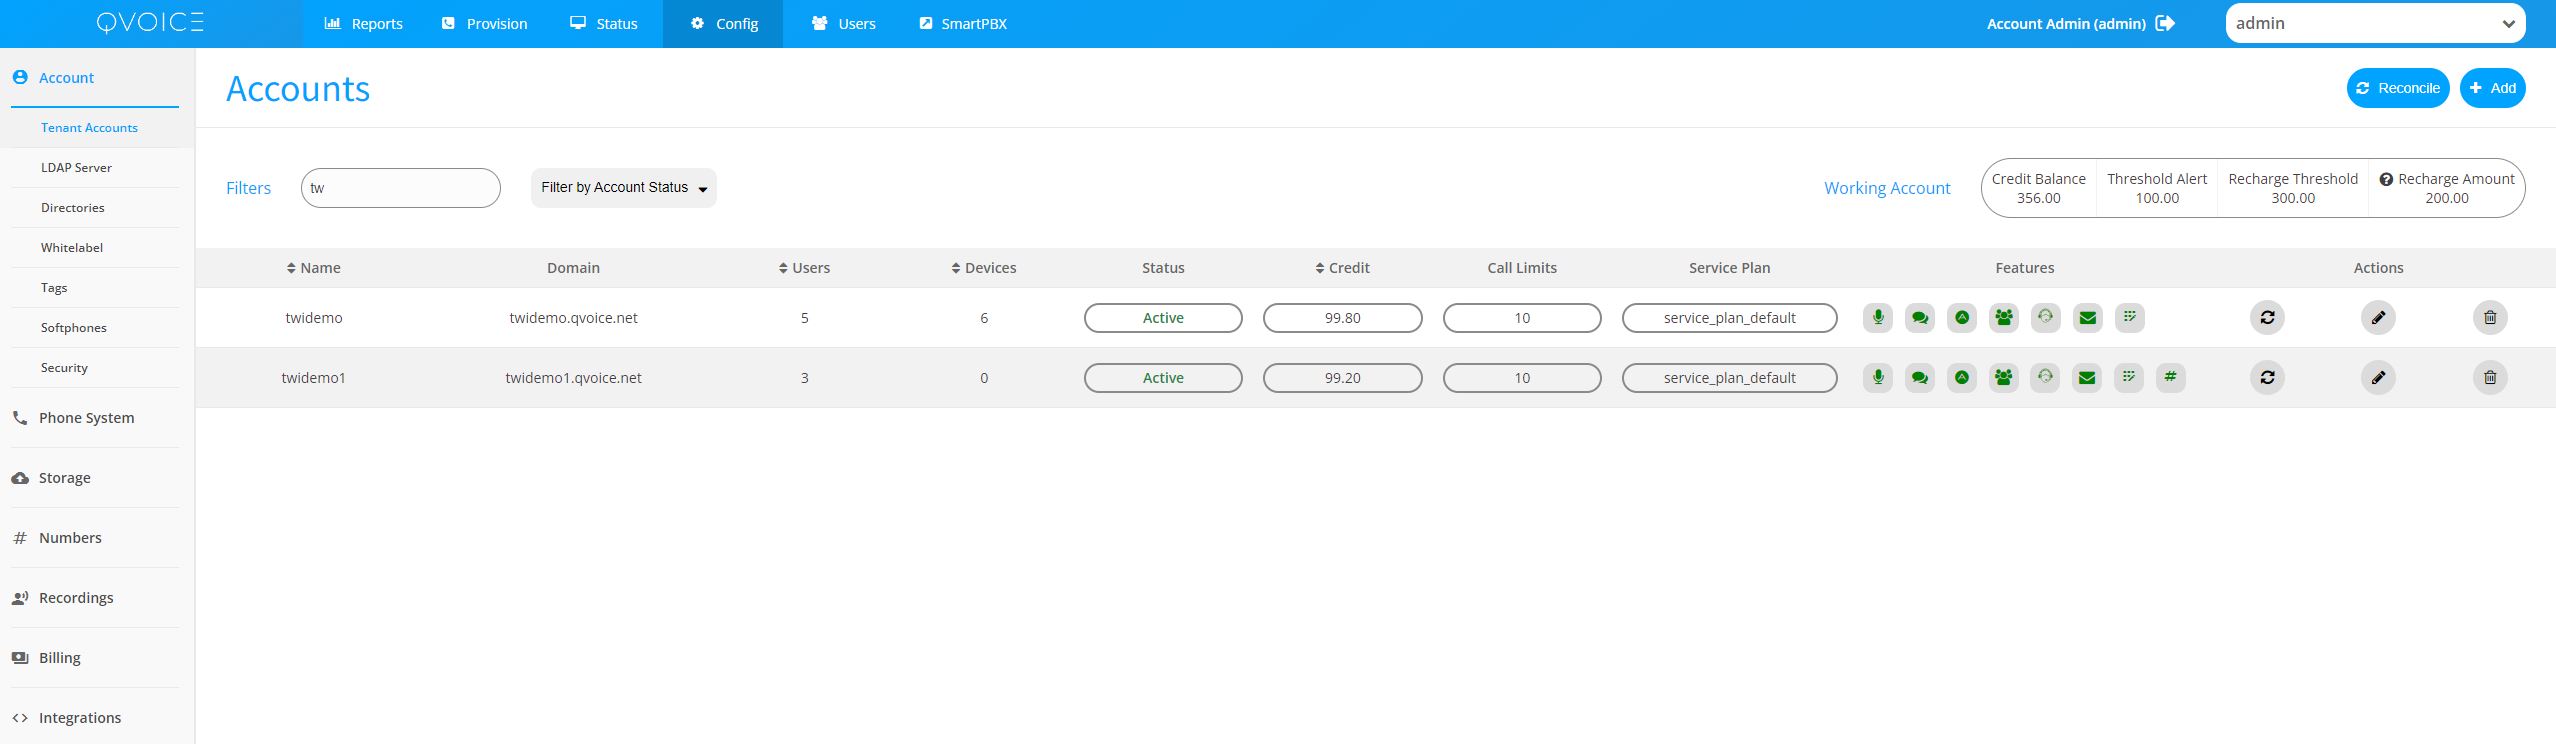
Find the an account and click on

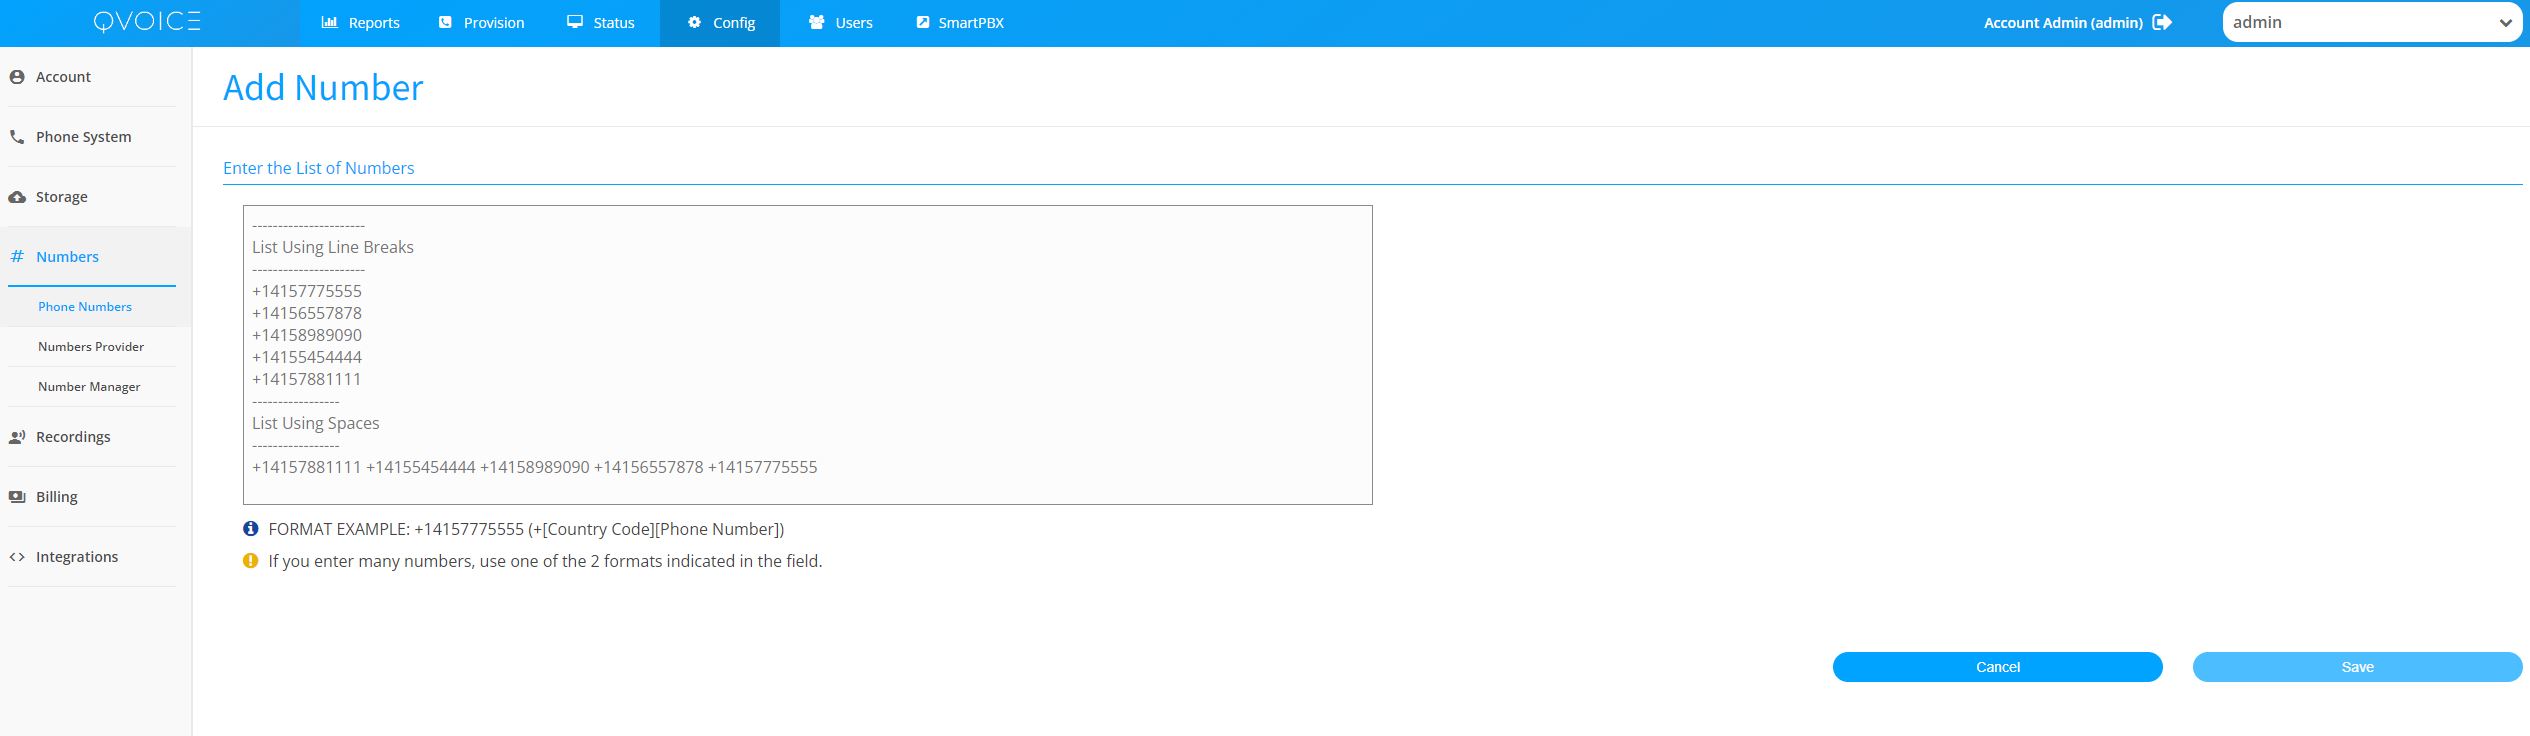
Add new numbers to the account: make sure to use the e.164 notation: for USA and Canada +14164445555, for other countries use the country code +622129303030.
At this point the phone numbers have been assigned to the customer's account. The next step is to log into the customer's account and configure the cloud PBX.
¶ Set Account level Caller ID
- Navigate to SmartPBX from Portal
- Option1
- Click on CallerID in Dashboard Section of SmartPBX
- Option2
- Select Callflow Application in SmartPBX
- Select Account Settings
- Set callerid for normal calls
- Set callerid for emergency calls
- Note: one must have at least one phone number bound to the tenant account to set account level callerid
¶ Set Account level Music on Hold
- Navigate to SmartPBX from Portal
- Option1
- Click on Hold Music in Dashboard Section of SmartPBX
- Option2
- Select Callflow Application in SmartPBX
- Select Play Media
- Upload Media files in MP3 format
- Select Account Settings
- Clickon Misc Tab
- Specify the uploaded MP3 file
¶ Add Users to the New Account
Admin can add a single or bulk upload users to an account using a CSV document. Navigate to Portal -> Users and then click Add.


- Specify First or Last Name
- Role: User or Admin
- User cannot log into the portal
- Admin can log into the portal and will have certain permissions based on Admin Type
- Admin Type
- Total access - full admin
- Read only allows user to read only, not able to configure or change anything
- User activation feature allows billing department to enable or disable users only
- Call Center supervisor is allowed to only manipulates the call center queues
- Extension
- Invite to platform allows one to auto invite user to platform via email on creation
- Conferencing allows admin to setup a audio conference for the user
- If user is included in directory, user will show up in Desktop, Mobile and IP phones with presence
¶ Invite Users to the platform
Admin can invite a single user or all users to the platform via Email or SMS. Users will receive an onboarding link that can be used to auto login to Web, Desktop or Mobile phone. There is no need to share passwords or create complicated onboarding procedures.
¶ Welcome Invitation
When a user receives the email and clicks the onboarding link, they will be greeted with a personal message and options to auto login to a Desktop app, Web app or Mobile app. Screen will change if the link is opened on Desktop or Mobile.

If the invited user is admin, the Admin section in the top bar, will also lead the Admin to the Portal magic link.

Users can also change their password in the top right hand corner section of the onboarding link. Via the

icon.
¶ Configure a new Cloud PBX
In this section we will outline all the steps necessary to configure a new customer cloud PBX.
¶ Summary
- Log into the Master Admin Account
- Select Account Management
- Select the Account from the account list.
- Log in to the account using the “Use Account” button.
- Select Smart PBX application
- Configure Main Number
- Bind “spare number” to the Main Number
- Configure working hours
- Configure holiday dates
- Configure Main Number Route / IVR
- Upload IVR greeting
- Bind “spare number” to the Conference
- Upload IVR greeting
- Bind “spare number” and an email to the FaxBox
- Create Users (if not already created in portal above)
- Bind extension to user
- Bind DID to user
- Bind a Device to user
- SIP Phone
- Cell Phone
- Configure extension features
- Find me follow me
- Voicemail
- Faxbox
- Create Groups
- Eg: Sales, Tech Support
¶ Log into the customer’s account
Log into the newly created account by selecting the “Use Account” button.

Master Admin can “masquerade” into any sub-account.
TIP: Current logged in account name is displayed in the top right corner.
Once the admin is logged into the customer’s account, click on the SmartPBX Icon to login into the SmartPBX application.

Smart PBX Configuration
The Smart PBX app combines the most common PBX functionality with a beautiful user interface and an intuitive experience. An advanced set of features such as individual fax-to-email boxes, call forwarding, and hot desking are easy to understand and utilize. A simple dashboard provides a quick but comprehensive overview of system configuration and status. Within this dashboard, review total users and devices, assign conference bridges and phone numbers. Create customized greetings and call routes to give your business that professional touch. Set functionality with a beautiful user interface and an intuitive experience. Set up a main business phone number and utilize the pre-built Virtual Receptionist to handle inbound calls.
To go into Select the Smart PBX application from the application exchange page.
Select the Smart PBX application from the portal top bar.
¶ SmartPBX Dashboard
When you click on the Smart PBX application it automatically defaults to the dashboard. The Dashboard consists of the whole overview of your organizational structure on the fonoUC PBX system. This app is used most for your configuration and setup for your Numbers, Users, Groups, Main Numbers, Devices, Voicemail Boxes, Feature Codes, Caller ID, Hold Music and Hours of operation. You are able to even view Call Log files for all users within your organization. You can click on each main heading within the dashboard or on the side panel to access each section of the Smart PBX application. The most frequently used features are prioritized, creating a more efficient work environment.

¶ Main PBX Number
Start customer cloud PBX configuration by adding a Main Number to the account.

Select “Add from Spare Numbers” and bind the Main number to the PBX. An incoming call to that number will be routed to the PBX IVR.

Specify the hours of operation. This option will allow one to configure business hours and closed hours IVR.

¶ PBX Inbound Routing
Specify the PBX incoming call routes: The SmartPBX attempts to provide a simplified IVR configuration. If a more complicated IVR is required, then the admin must use the Callflow application.
Select “Virtual Receptionist” to bind a Media file to the IVR.

The Virtual Receptionist plays a greeting and requests the incoming user to select an action from a menu. Eg: Press 1 for Sales, 2 for Technical support or if you know the extension dial it.
Click on Upload to upload an MP3 or WAV greeting.

Alternatively admin can dial in and record the Main Greeting.

¶ Conference
Main conference requires a phone number/DID. Click on “Add from spare numbers” and bind a phone number to the main phone conference. When customers dial this number, they will be presented with a greeting and will be asked to enter a conference room and a pin code.

Note: Individual conferences are configured under User configuration.
¶ Faxbox
Main Faxbox requires a phone number/DID. Click on “Add from spare numbers” and bind a phone number to the main faxbox. When customers send faxes to the faxbox phone number/DID, the fax will be converted to a Tiff/PDF and sent via email to the PBX admin or individual user. Furthermore, PBX users can email a PDF to a special fonoUC faxbox email account that will transmit the fax via PSTN to the remote fax machine and email back the result.

Individual faxbox configuration is performed under per User configuration.
¶ User Creation
Select “Users” from the SmartPBX dashboard and click on “Add User”. Once the user is created, the credentials will automatically be emailed to the user and the system administrator.

Security: Always let the system define and email a random password to the end user.
Please note: A user can be an individual or a device. Example a conference room with a phone will need a user account. All extensions are assigned to a user or group.
¶ User PBX Features
User PBX feature section allows the administrator to configure per user features such as: find me follow me, faxbox, voicemail, conferences etc.

¶ Caller ID
If enabled in numbers this feature can be turned on or off here. If you don't enable this feature, the Caller-ID displayed by default will be the one configured on the Main Number of this account.

¶ Call Forwarding
To activate this feature click on On. You can specify what device or number you would like the calls forwarded to. You can choose to leave voicemails on the forwarded number, Forward direct calls only and Keep the original Caller-ID. Please remember to save changes.
Forwarding can be enabled from SmartPBX or from the Web/Desktop Softphone.

You can set Call Forwarding as part "Failover Mode", the call-forward settings will only apply when none of this user's devices are registered.

¶ Hot-Desking
This feature enables multiple users to log in and make calls on a single PBX enabled handset using their four-digit operator extension number and PIN. Example uses for Hot-Desking include: Multiple employees using 1 phone at different times during the day, different employees assuming reception responsibilities, unassigned desks where employees play musical chairs, or running multiple entities from a single device.

- Enable hot-desking for a specific User A
- Enter a Hotdesk ID (Must Be Unique)
- For extra security you can assign the Hot-Desk a pin number but this is not required
- Checking the Allow login at multiple devices allows multiple logins for employees
- Press Save Changes and Hot-Desking will be enabled
- Important: Find-me-Follow me must be disabled for User A.
- If enabled, incoming Hotdesk calls will not work and all incoming calls to User A will continue to be sent to User A and not the Hotdesk user device.

¶ Hotdesk Login
- From User B phone, simply dial the feature code *11
- Enter in the Hot-Desk ID (and PIN) of User A (the user we want to take over calls from).
- Now all outgoing calls from User B will user User A caller id
- All inbound calls to User A will be routed to both User A devices and Hotdesk User B devices
- Hotdesk User B is able to answer all User A calls
- Note: the above process can be repeated for multiple Users thus, User B can take over phone control for multiple Users (e: User A and User C) via their unique Hot-Desk ID.
Warning: However, if User B takes over multiple hotdesk phones, outbound caller id will be broken/non-deterministic when User B makes outbound calls as there is no way to define which hotdesk callerid User B should use.
¶ Hotdesk Logout
- Hotdesk User B can logout from all hotdesk devices by dialing *12
- Alternatively User B can also dial *13 and choose which hotdesk device to logout from.
¶ Voicemails
If you have set up voicemails for each user you will be able to enable or disable them voicemail under each user or check to have them delete messages from the database after sending notifications. All other Voicemail setup will be explained in section Voicemail Box

¶ Faxbox
To enable user to receive an email when a fax comes in can be done in the Faxbox feature

¶ Conference Bridge
You can create a conference call by providing a conferencing phone number and your personal room number to the participants this is enabled under the user.

¶ Find Me, Follow Me
Always be available with this fonoUC PBX feature. Find Me, Follow Me enables incoming calls to “find me” and deliver those calls to any location, while the “follow me” provides the ability to receive calls at any number of your designated devices. Your “follow me” phone number is routed through a list of numbers you choose (cell, home, office, etc.), in your preferred order, until the call connects to you.
If incoming calls are not answered within a specific number of rings, they are instantly transferred to the voicemail system. Callers are prompted to leave voice messages, which can be retrieved later, at your convenience. You also have the option for Do Not Ring on any particular device.

You are able to set the distribution of how long to wait before you try the next device
¶ Music on Hold
Here is where you can set Music on Hold for individual users , If non is set then it will use the default Music on Hold for Main Number

From this window you have the choice of our Default Music, or you can upload your own file and use it. Compatible formats are .WAV, .MP3, and .WMA
¶ User Account Info
Click on the user name in order to open the User account setting information.

This section allows the Administrator to
- Reset user’s password
- Reset voicemail box pin
- Change privilege from User to Administrator
- Set user’s timezone
- Add to or remove from company directory
- Change extension number
¶ Users Extensions
Set the user's extension by clicking on the Extensions tab.
A user can have one or more extensions assigned.

¶ Users Direct Phone Numbers
Set the user's phone by clicking on the Phone Numbers tab. A user can have one or more Phone numbers (DIDs).

¶ Group Lists
Create a group and add existing users to it. When the group extension is called, all the users will be called and the one that answers will get the call.

- Name the Group
- Find an available extension by clicking on Find One or Add one
- Hold and drop user into Selected user field
- Create Group
¶ Group Calling Policy
Group ringing can be configured for: Simultaneous, In-Order or Random.
- Simultaneous ring groups will ring all users or devices in a ring group until one answers.
This is the DEFAULT strategy when configured from SmartPBX. - In-Order strategy will call one user/device at a time.
- Random strategy will randomize the users in the group and then dial In-Order
In order to change the default: simultaneous ring strategy in a group, one will have to EDIT a Base Ring group call flow in the Callflow app.
- Navigate to Callflows App
- Click on Callflows
- 1. Search for Base Group call flow for desired Ring Group
- 2. Click on Ring Group in sidebar
- 3. Click to edit the Ring Group
- 4. Change the Ring Strategy
- 5. Save Ring Group

The group can be ringed multiple times before the caller is hung up or passed to the next action.
¶ Group Pickup
When a device that is part of the ring group is ringing in the office but no one is able to pick it up, a group pickup feature will allow others in the group to answer the incoming call by dialing a special extension.
Eg: Incoming call on group Sales (extension 2)
- If nobody is in the office to answer a ringing phone or phones, a user can dial extension 500 in order to answer the call that is currently ringing on a group.
In order to configure the Group Pickup, one must create a Callflow in Callflow app.
- Navigate to Callflows
- Add Call Flow
- Specify an extension, eg: 500
- Drag and drop the “Group Pickup” feature from the left menu
- Double click on “Group Pickup” feature
- Specify a Group that user would be able to pickup from
Testing
- From one phone, dial the group that was bound to the group pickup.
- Once the phone is ringing, from another phone dial the above extension 500 in order to pickup the inbound call on call group.
¶ Group Pickup Callflow

Bind group pickup to the group

¶ Devices
Devices are considered user endpoints. Some devices allow sip registrations such as sip phones, mobile sip or desktop clients. Other devices such as cell phones do not have any sip information as they reside on the PSTN and 3G/4G networks.
Note: A Device must be bound to a User and a user can have multiple devices associated with it.
Important: Never use the same device credentials on multiple SIP endpoints, this can result in unexpected behaviour as two devices will compete for incoming calls. Always create separate devices for each endpoint. Example: Mobile client and Desktop client.

Specify device name: always use a name that associates a device to a user.

Security: Always let the system specify the random credentials that will be emailed to the end user.
Advanced device configuration: one can specify codecs, secured RTP etc...

¶ Secure RTP
In order to enable secured communications, select the Advanced, Miscellaneous option.
Enable “Encrypt the audio” and specify SRTP. Save configuration and exit the menu.
At this point the device is configured for secured communications. The next step is to configure the endpoint client (softphone or deskphone) that will be registering to this device for TLS/SRTP.
¶ Voicemail Configuration
By default, each created user will get a Voicemail box. When the extension dials the voicemail via *98 the voicemail will prompt the user to set their greeting and set new credentials.


Editing Greeting - you can basically edit each users voicemail box here or from the user screen as mentioned before. You have access to several Options, Recipients, Greeting Medias

Options: Set Timezone for remote users, Media type (mp3 or wav)
Recipients - add additional recipients of the voicemail box

Greeting Media - option to upload a greeting, click on Upload and browse for greeting(s). Conversely every user has the ability to record their voicemail using Feature code *97

¶ Feature Codes
Feature codes can be configured in Callflows application.


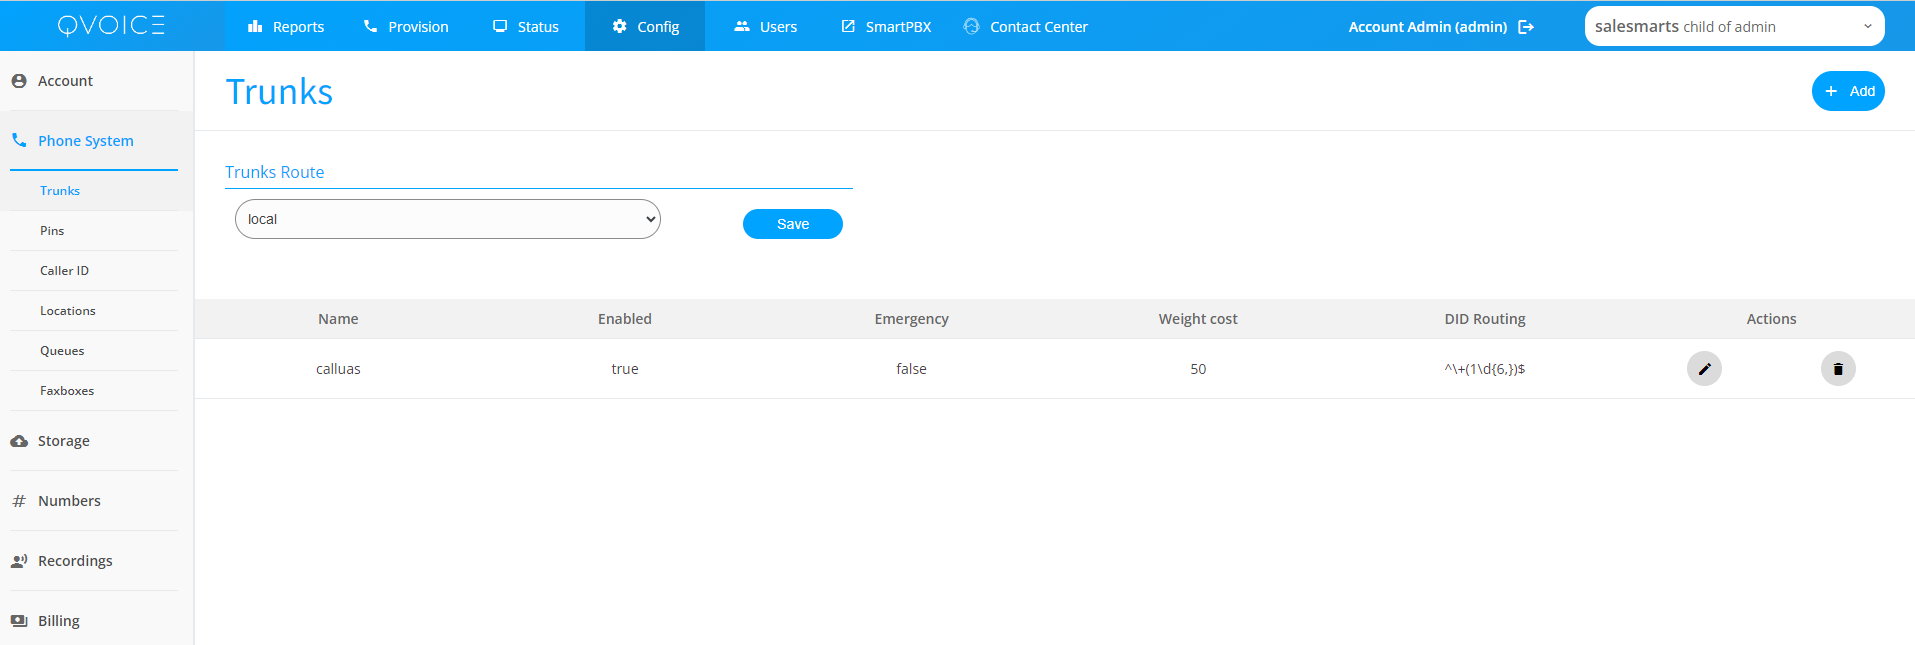
¶ SIP Trunks
SIP trunks are used to configure outbound call routing rules usually from a Tenant account to an external PSTN trunk.
Navigate to Config → Phone System → Trunks
- Click on Add to add a new trunk
- Click on Trunks Route to select Parent or Local trunks
- Click Edit in Actions to Edit an existing trunk
Trunks Route
Configuration Option used to select outbound sip trunks used for the current tenant account.
- Parent: use parent account trunks, default behavior is not to create trunks for each tenant and to use the parent trunks for all tenant accounts
- Local: use trunks configured in local account, select this option in order to create custom trunks for a tenant
¶ Create a new SIP Trunk
Click on Add button to create a new trunk
The trunk config is in JSON format due to complexity and flexibility required to setup a SIP Trunk.
This config is usually created once on system setup and the trunks are re-used by sub tenant accounts.
|
{ "name": "", "enabled": true, "emergency": false, "flags": [ "fax" ], "gateways": [ { "server": "", "channel_selection": "ascending", "codecs": [ "PCMU", "PCMA" ], "media": { "fax_option": true }, "enabled": true, "endpoint_type": "sip", "force_port": false, "invite_format": "route", "password": "", "port": 5060, "prefix": "", "progress_timeout": 20, "realm": "", "skype_rr": false, "username": "" } ], "rules": [ "^\\+(1\\d{6,})$" ], "weight_cost": 50 } |
Minimal Configuration
- Name: Name of the trunk
- Gateways.Server: IP address or URL of the remote trunk
- Gateways.Realm: Same as Gateways.Servers (IP address or URL of the remote trunk)
- Rules: If rules matches the TO number, then the outbound call will use the matching trunk for its outbound call routing.
- weight_cost: Lower the number the more priority the trunk has
- Prefix: Add a prefix to a matched TO number
¶ Custom Outbound Caller ID
Format the outbound callerid to use Local format. In example below, match FROM number and only save what is in the brackets (), then prefix the match in () with previx.
eg: A from number matching +661234567 would be converted to 01234567. The digits not in () brackets will be removed.
|
{ "emergency": false, "enabled": true, "flags": [ "fax" ], "formatters": { "outbound_caller_id_number": { "prefix": "0", "regex": "^\\+?66(\\d{5,})$" } }, "gateways": [ |
Force callerid to a value
|
{ "emergency": false, "enabled": false, "flags": [ "fax" ], "formatters": { "outbound_caller_id_number": { "value": "14165554444" } }, "gateways": [ |
¶ Phone Provisioning
Yealink Phone Provisioning
Provisioning URL
- Protocol: HTTPS
- HTTPS Server: {system_url}
- HTTPS Path: /provisioning/yealink
- Port: 9443
https://qvoice.net:9443/provisioning/yealink
Portal Configuration
Navigate to Admin Portal → Provisioning
- Create a Phone Profile, if one does not exist
- Create a Phone Device
- map it to the Phone Profile
- Map the phone MAC address to the User
- map it to the Phone Profile
¶ HTEK Phones Provisioning
Provisioning URL
- Protocol: HTTPS
- HTTPS Server: {system_url}
- HTTPS Path: /provisioning/htek
- Port: 9443
https://qvoice.net:9443/provisioning/htek
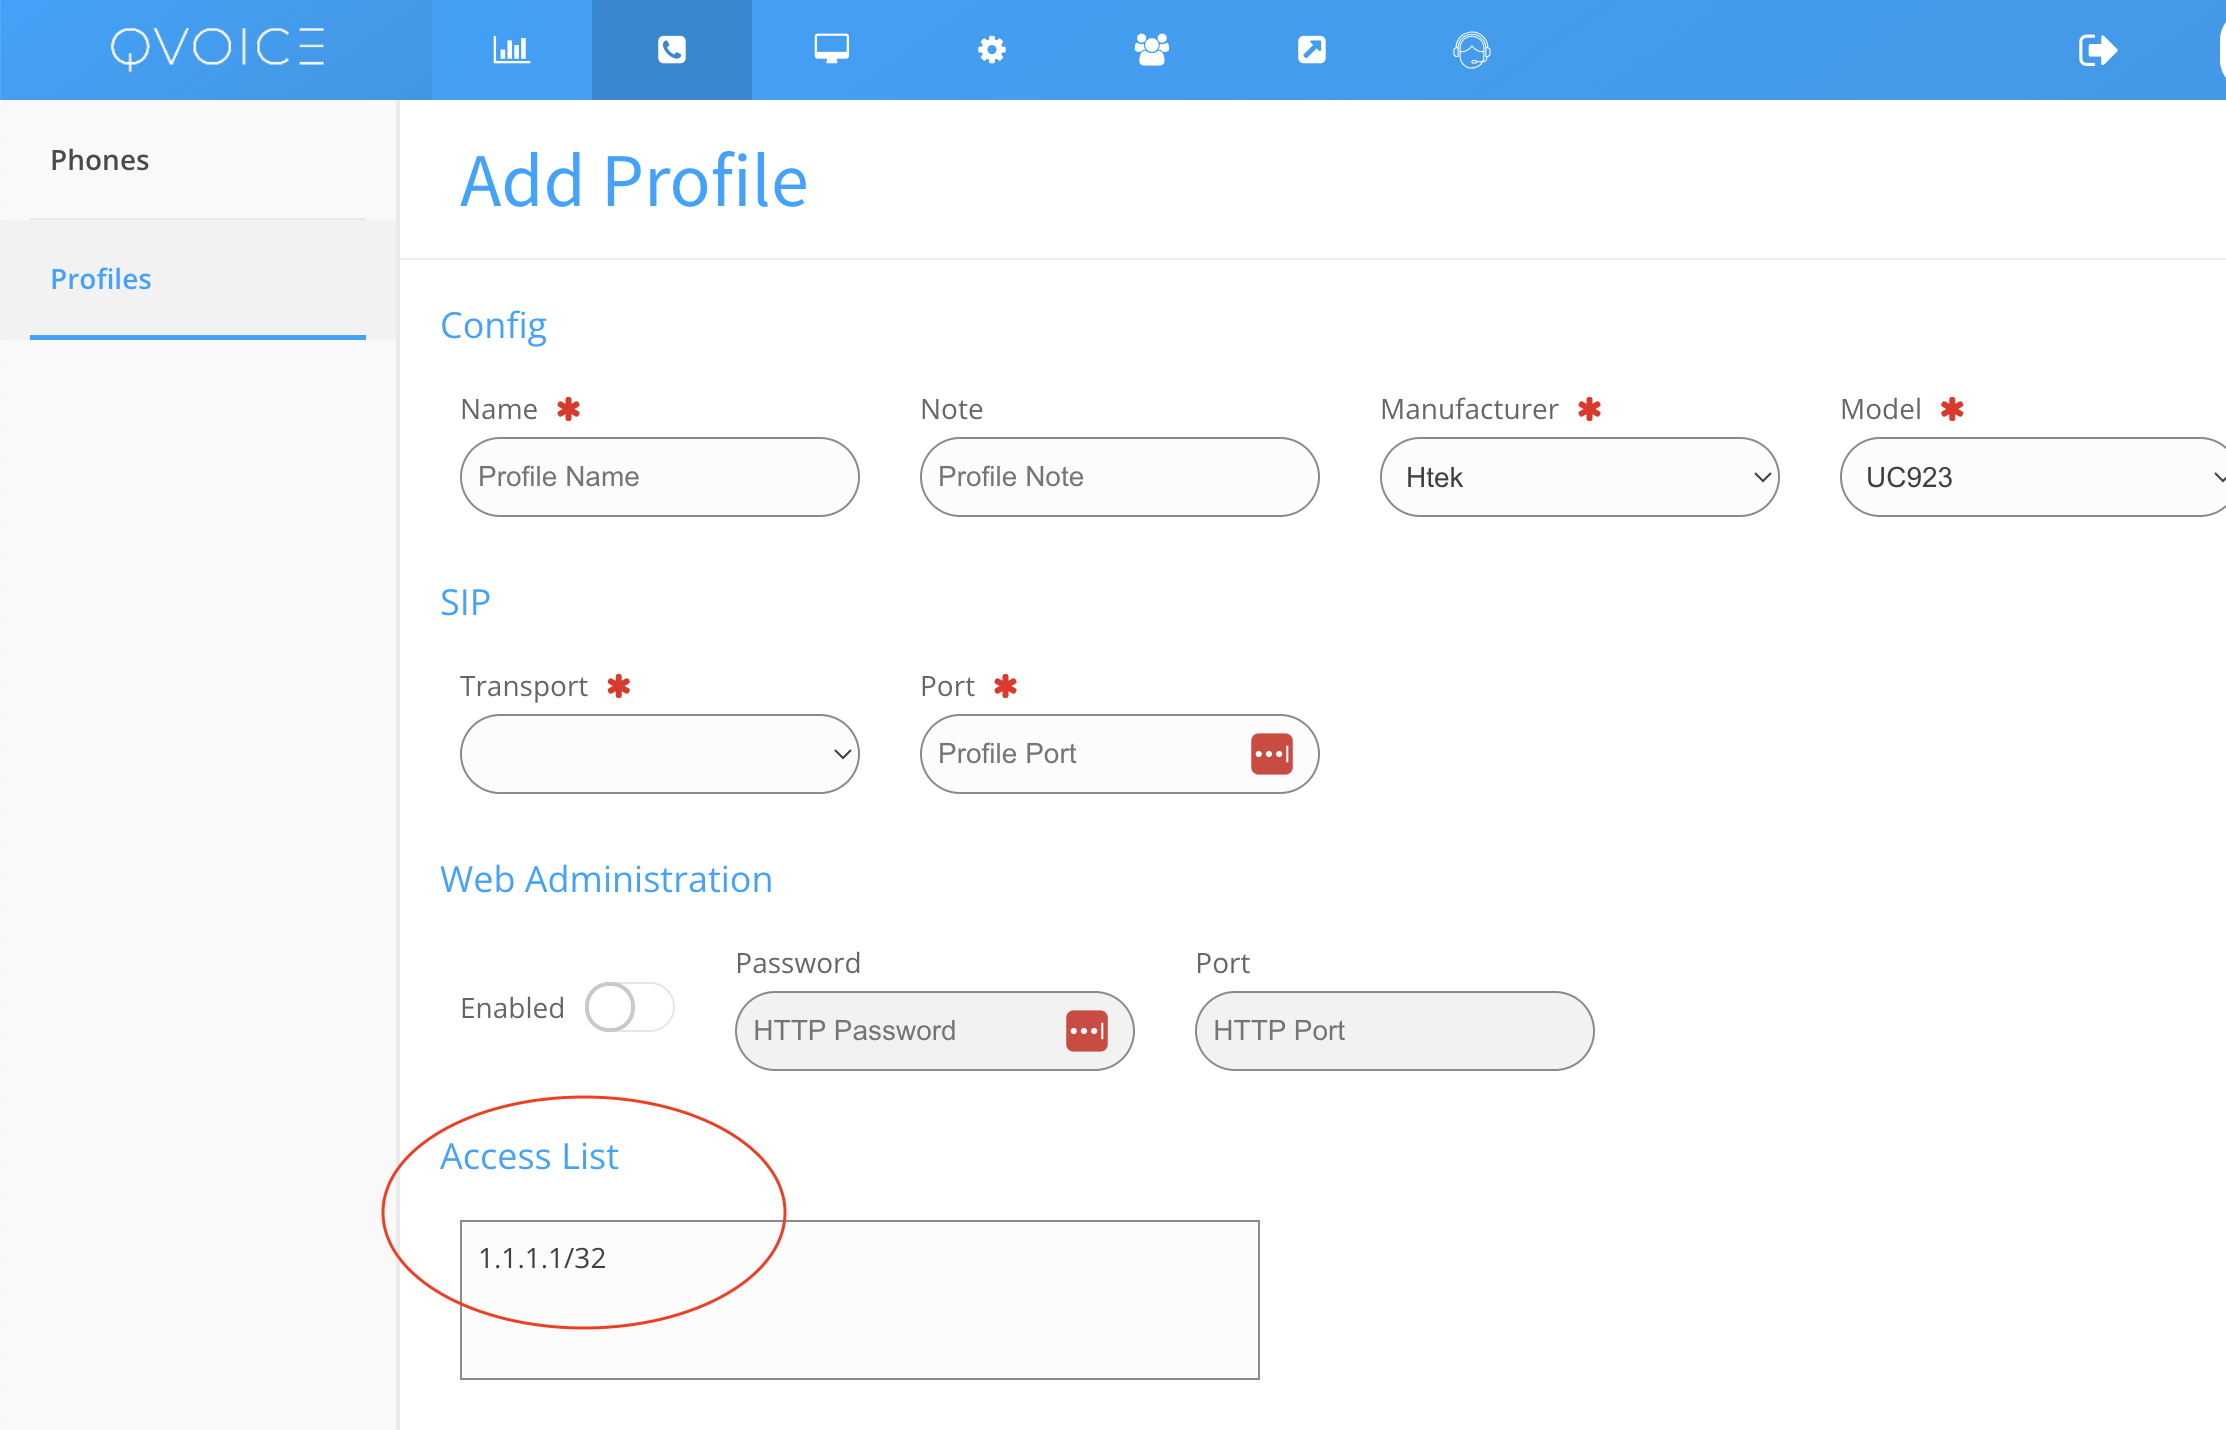
¶ ACL configuration
In order to be able to provision HTEK phones ACL must be configured on Profile with network IP address or phone IP address to be provisioned including mask. Otherwise phone requests will be rejected.
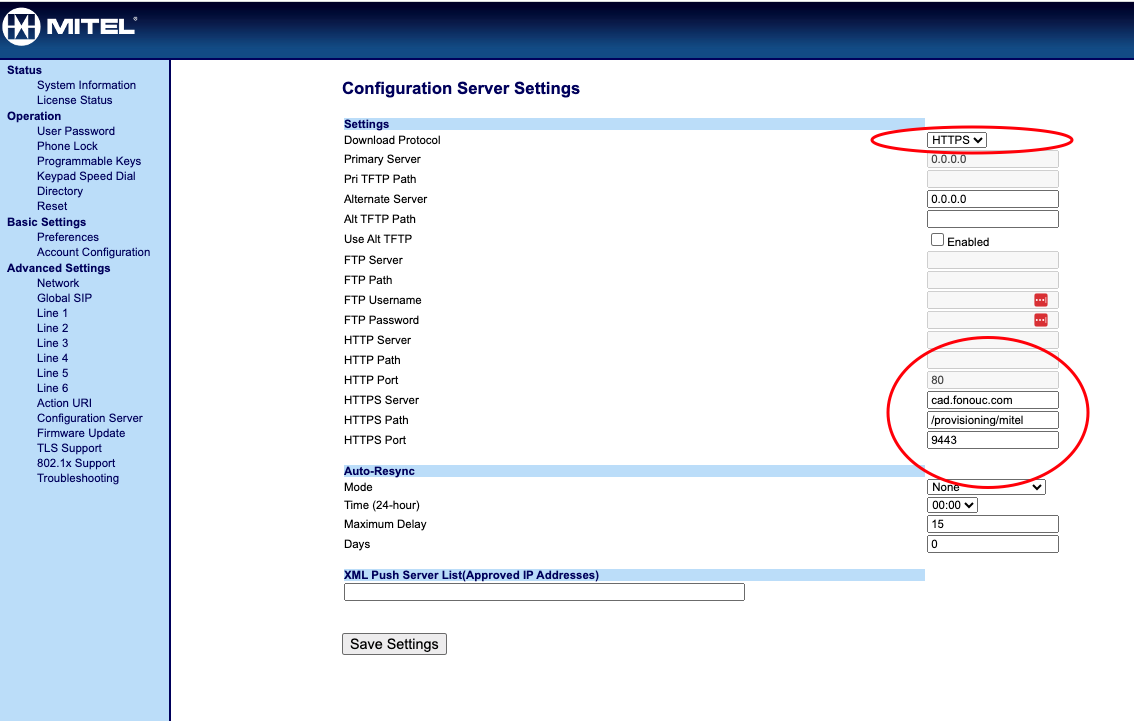
Mitel phones provisioning
¶ Configuration Server
- Protocol: HTTPS
- HTTPS Server: {system_url}
- HTTPS Path: /provisioning/mitel
- Port: 9443
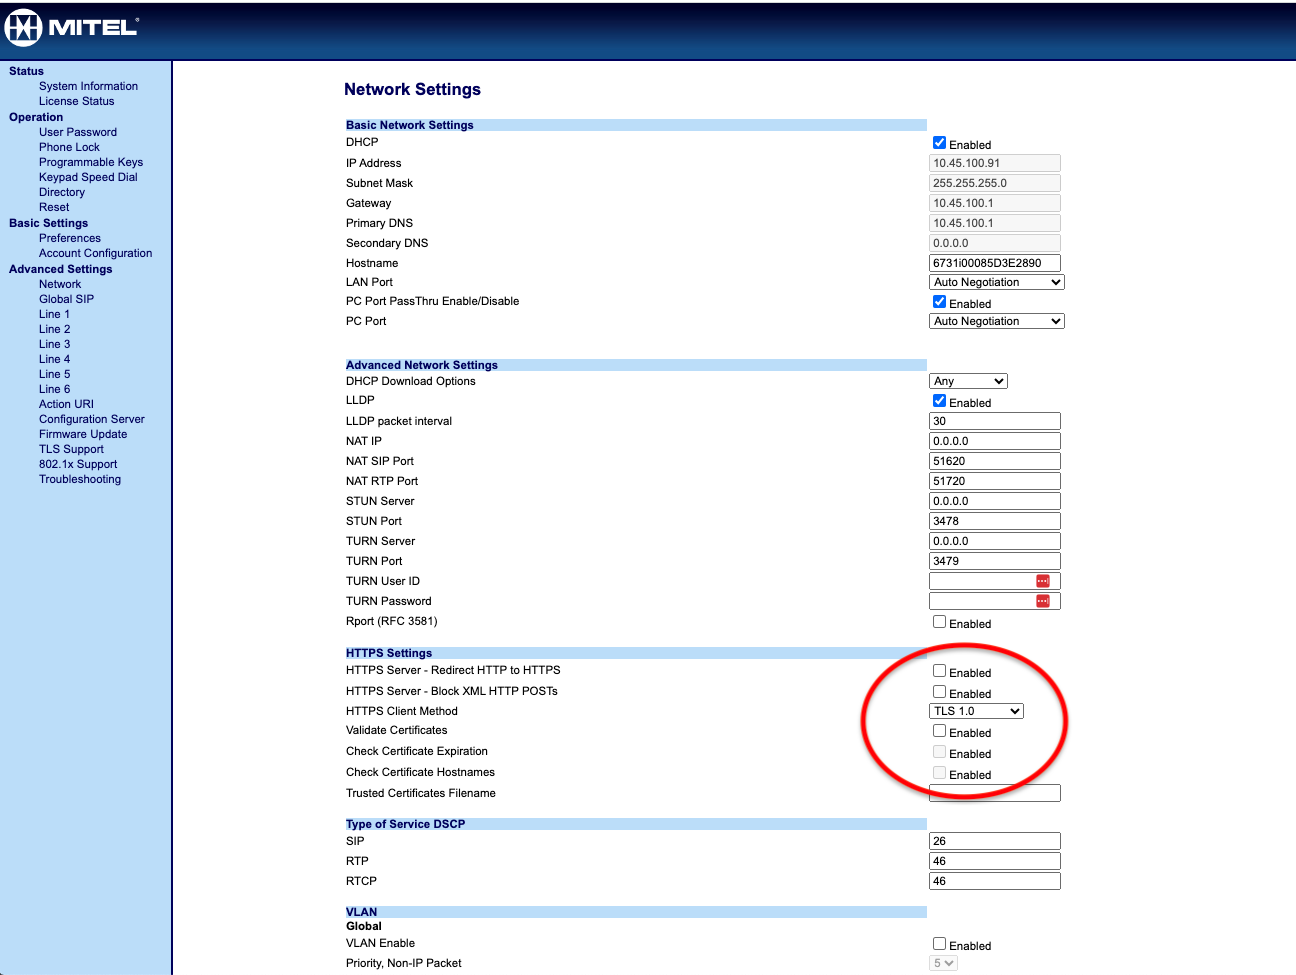
Advanced settings → Network
HTTPS Client Method: HTTPS
Validate Certificates: False
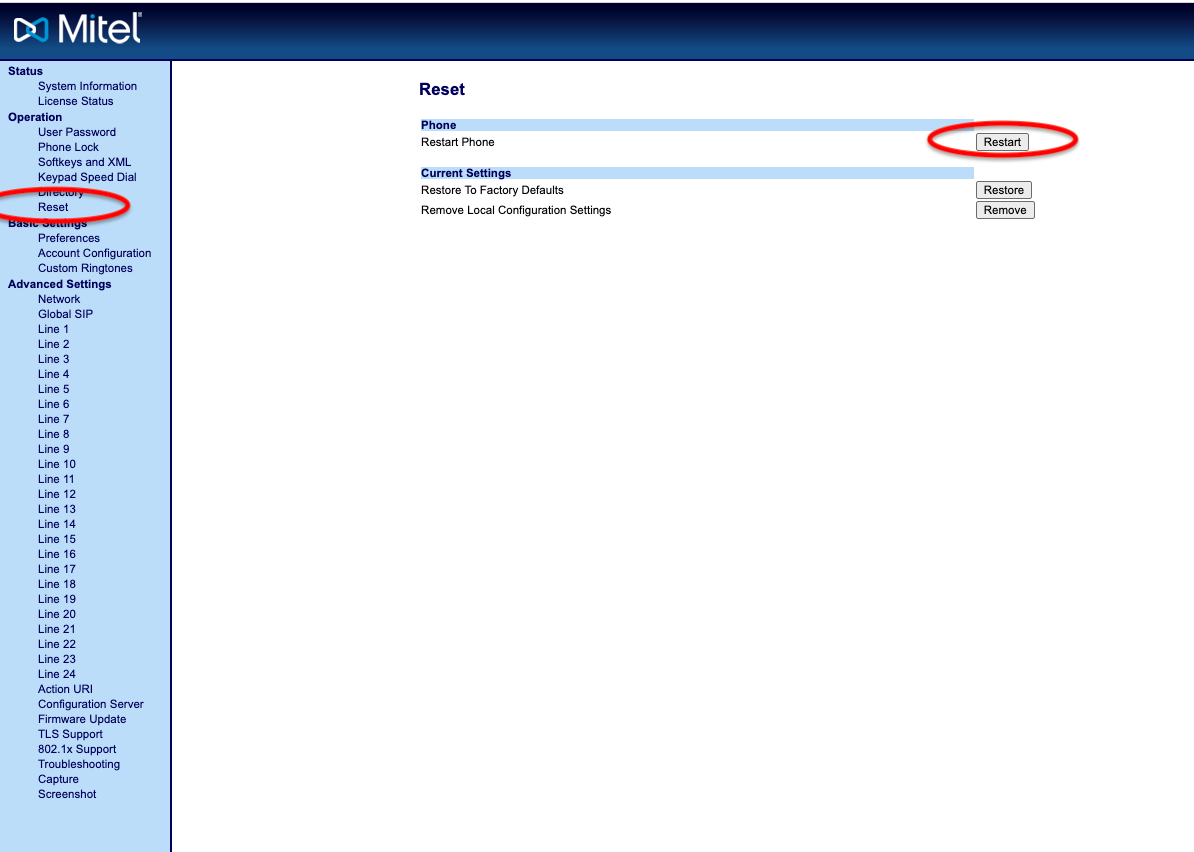
¶ Restart the phone
¶ Fanvil Phones Provisioning
¶ Configuration Server
- Protocol: HTTPS
- HTTPS Server: {system_url}
- HTTPS Path: /provisioning/fanvil
- Port: 9443
Setup Summary
- Create Fanvil Phone Profile on QVOICE Portal
- For each Fanvil Phone add a Phone device in QVOICE Portal bound to the Fanvil Profile
- Unlock each Phone device
- Navigate to each Fanvil Phone GUI
- Set the Auto provisioning URL to: https://qvoice.net:9443/provisioning/fanvil